
Install and Run
This path gets you from an empty Tycho installation to one supervised agent session. Start in the Welcome Sandbox, then add a real project when you are ready.
Requirements
Section titled “Requirements”- macOS with Homebrew for the packaged install.
- For a source install: Ruby 3.2 or newer, Bundler, Go, and native build tools. Source installs also work in Linux-style environments and Windows 11 through WSL.
- At least one installed and authenticated coding-agent CLI: Codex, Claude, OpenCode, Pi, or a compatible custom harness profile.
Install with Homebrew
Section titled “Install with Homebrew”brew tap firewalker06/tychobrew install tychoExisting Homebrew users can upgrade with:
tycho updatetycho update is for Homebrew installs and safely restarts any running local Remote UI server or scheduler daemon. Source checkouts update with Git; rerun bin/setup if its dependency check asks you to.
After upgrading from 0.10.2, verify the installed release:
tycho --versiontycho --helptycho doctortycho project listtycho schedule listProjects must now be created explicitly: replace tycho project my-project with tycho project create my-project [options]. Use tycho project show my-project to inspect an existing project. In Remote UI, update every Tycho-owned skill in Settings → Skills, then restart a harness if it does not discover the new skill. Tycho will not overwrite an unmarked or locally modified skill.
Existing Claude custom profiles keep working, but new profiles must declare one native adapter: codex, claude, opencode, or pi. Automation using the removed tycho github login, tycho github status, or tycho github logout commands must be deleted; read-only agent pull-request diffs use an authenticated local gh CLI.
The release also adds FRED, schedule creation and editing, workspace search and previews, queued follow-ups, richer summary and attachment rendering, and agent-switcher improvements. See the v0.11.0 release notes for the complete change list.
Install from Source
Section titled “Install from Source”Use a source checkout when you want to contribute or Homebrew is not suitable:
git clone https://github.com/firewalker06/tycho.gitcd tychobin/setup --checkbin/setupbin/tychobin/setup --check reports missing requirements without installing gems or creating config files. bin/setup installs dependencies, creates the user config files under ~/.tycho, and runs tycho doctor as a smoke check.
The remaining commands use the Homebrew executable, tycho. For a source checkout, replace it with bin/tycho.
Choose a Control Surface
Section titled “Choose a Control Surface”Tycho offers to create a safe Welcome Sandbox when it starts without any projects. The sandbox lives at ~/.tycho/workspaces/welcome and contains a small README.md and notes.md.
Choose the terminal or Remote UI for your first run. Both paths create the same sandbox and run the same task.
Before you start, confirm the selected harness is installed and authenticated. The harness—not Tycho—ultimately enforces model access, approval, and sandbox behavior. The Welcome Sandbox keeps this first write away from a real repository; review Harness Safety before registering one.
Terminal
Section titled “Terminal”Open the TUI:
tycho-
Choose Create Welcome Sandbox.
-
On the Projects screen, keep Welcome Sandbox selected and press
n. -
Enter this prompt:
Read README.md and notes.md.Add one practical next step to notes.md, then summarize the change. -
Choose Create and Run Agent.
Tycho switches to the Agents screen and opens the session chat. You can watch the conversation there.
Once the sandbox exists, you can run the same task from the CLI instead:
tycho agent create welcome \ "Read README.md and notes.md. Add one practical next step to notes.md, then summarize the change." \ --runUse the key returned by that command to inspect the session:
tycho agent status <agent-key>tycho agent logs <agent-key> --type conversationRemote UI
Section titled “Remote UI”Start Tycho on localhost:
tycho serve --host 127.0.0.1 --port 7373Keep that terminal open, then open http://127.0.0.1:7373 in your browser.
-
Choose Create Welcome Sandbox.
-
Open Welcome Sandbox, then choose New agent.
-
Enter the same prompt:
Read README.md and notes.md.Add one practical next step to notes.md, then summarize the change. -
Choose Create and run.
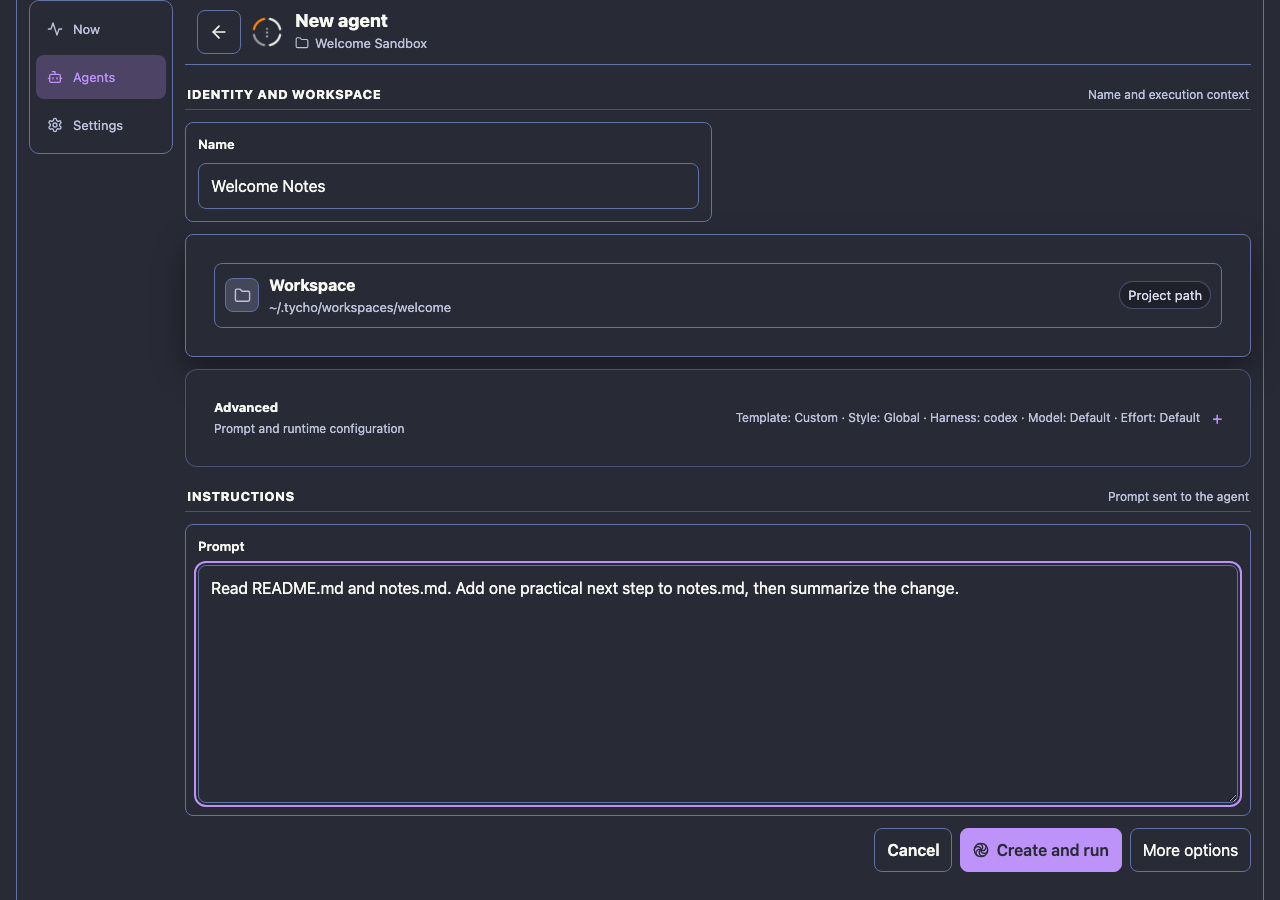
Remote UI records and displays the same agent session state as the TUI and CLI.
See Remote UI for live conversations, queued follow-ups, localhost and tailnet safety, schedules, and multiserver ownership.
Continue the Loop
Section titled “Continue the Loop”When the agent finishes, ask why it chose that next step.
In the TUI or Remote UI, send the follow-up from the session chat. From the CLI:
tycho agent send <agent-key> "Explain why you chose that next step."You have now completed Tycho’s core loop: create work, watch it, respond when useful, and keep the session record durable.
For agent-led operation, open Settings → Skills in Remote UI. Tycho can install its bundled tycho skill for Codex, Claude Code, OpenCode, or Pi after confirmation. Verify the row reads Installed, then invoke $tycho in Codex or OpenCode, /tycho in Claude Code, or /skill:tycho in Pi. See Harnesses for ownership and update safety.
Add a Real Project
Section titled “Add a Real Project”Tycho stores registered projects in ~/.tycho/config/hq.yml. Choose one of these methods to add a local repository.
From the TUI
Section titled “From the TUI”- Open
tychoand press2for Projects. - Press
Nto open the New Project form. - Enter the local project path first. Tycho suggests paths and derives the project key and name.
- Choose the default harness, then select Create Project.
From the CLI
Section titled “From the CLI”Run this from any directory:
tycho project create my-workspace \ --path ~/Code/my-workspace \ --name "My Workspace" \ --group Personal \ --harness codexSee the CLI Reference for project update and archive commands.
Ask an Agent from Remote UI
Section titled “Ask an Agent from Remote UI”Remote UI cannot register an arbitrary local directory. It can search files, preview Markdown and images, and make guarded plain-text edits only inside an already registered project; existing workspaces remain read-only on mobile. To register a new path from the browser, ask an agent in the Welcome Sandbox to run the project command for you.
Create another Welcome Sandbox agent and give it the exact existing path:
Use the Tycho CLI to register /Users/you/Code/my-workspace as a project.Use project key my-workspace, display name "My Workspace", group Personal,and Codex as the default harness.Run `tycho project show my-workspace` afterward and report the result.The new project appears in Remote UI after Tycho refreshes its project registry.
Open the project’s Files view to search and browse bounded listings, preview supported text files, and make guarded plain-text edits. It stays inside the registered project and excludes sensitive, generated, binary, oversized, and unsafe paths. See Projects and Agents for the boundary.
Once one agent session is coordinating several bounded tasks, continue with Delegating Work Between Agents.
For the full create, send, run, stop, clone, and archive behavior, see Agent Session Lifecycle. To run recurring work in one durable session, see Schedules.
Optional: Open Remote UI on Your Tailnet
Section titled “Optional: Open Remote UI on Your Tailnet”Localhost is the safest first run. Before exposing Remote UI on Tailscale or another non-loopback address, set an access token:
TYCHO_REMOTE_TOKEN_VALUE="$(ruby -rsecurerandom -e 'puts SecureRandom.hex(24)')"export TYCHO_REMOTE_TOKEN="$TYCHO_REMOTE_TOKEN_VALUE"printf %s "$TYCHO_REMOTE_TOKEN_VALUE" | pbcopytycho serveThe named variable keeps the generated value available, while pbcopy copies it without printing it. When Remote UI asks for authentication, paste that same value into Remote token and save it. On WSL, replace pbcopy with clip.exe; on Linux with Wayland, use wl-copy. Keep the token private, do not put its literal value in shell history, and run unset TYCHO_REMOTE_TOKEN_VALUE TYCHO_REMOTE_TOKEN after the server stops.
When Tailscale is available, Tycho prints its MagicDNS URL and a terminal QR code. Use that URL from another device on your tailnet.